
Flexible Seating Series Part 2

Welcome back! I'm hoping you're joining me after spending some time with my considerations outlined in the first part of my alternative seating series. If not, go ahead and hop on over there so work through some guiding questions before you invest the money, time, and effort into switching up your entire classroom.
When I began my transition to alternative seating, it was December. One of the catalysts for this classroom transition was a larger transition of technology in my district. They were officially switching us from bulky desktop computers to sleek Apple laptops, thus freeing up space in our classrooms. While that whole transition could be a blog entry of its own, long story short is that I got a huge section of my room back and also got two long tables that had once been used for computer tables to use in other ways in my room.
I immediately began imagining how nice it would be for my students to have access to larger work tables as opposed to their small desks. At the same time, I noticed how often my students worked on the floor when given the option and the popularity of clipboards in my classroom.
My alternative seating classroom has seen a few iterations over the years and I am admittedly working on another as I prepare for a new school year. Ultimately, experience and falling forward has led me to develop a few guidelines in preparing our space for successful alternative seating!

- Consider your class- before I began changing up my room I observed them for a few days sitting anywhere they wanted to get their work done. I noted how many students were sitting at their desks, how many preferred to lay on the ground, etc. this helped me determine what kinds of spaces we would need and how many.
- Provide variety- a huge purpose of alternative seating is giving your kids a choice in what works for them. Therefore it's essential that you provide a number of options. You don't have to go crazy either. Start with two or three and then add options as needed.
- Vary the height- make sure that you have opportunities for your learners to stand, sit, and lounge. Therefore, vary the height of your workspaces so that students can work at in their preferred posture.
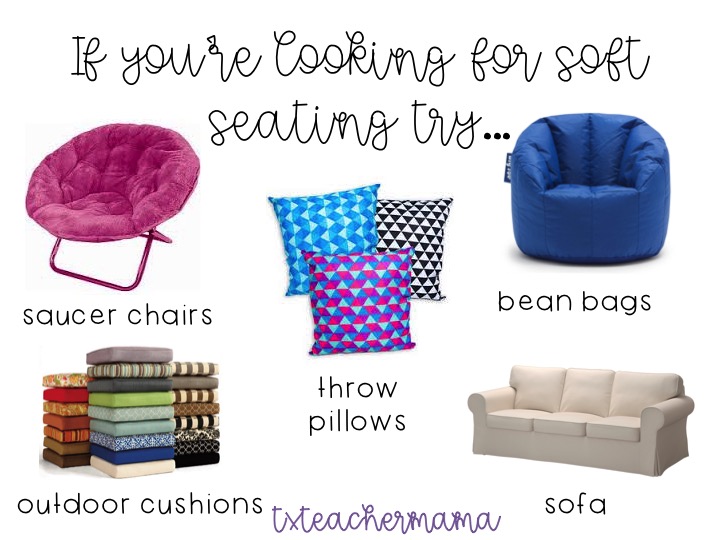
- Vary the texture- some students will get their best work done in a soft cushy spot while others may need the structure and support of a chair.
- Allow for movement- one of the big reasons I rolled this out in my classroom was because I had so many students that I had labeled "wiggle worms." Include seating like stability balls or hokki stools to allow for this type of movement.
Here are some ideas in order to add all sorts of variety to your flexible seating:


- Have the custodian make desks or tables as high as possible so that students can stand at them
- Allow students to stand at a counter or low book case in your classroom to work
- Have the custodian take the legs off of desks or tables so that students can work at the table while sitting on the floor
- Allow students to use a clipboard while sitting at a normal seat
- Allow students to work under a table or desk
- Allow students to sit or lay on the carpet
- Allow students to use your rolling teacher chair during independent work time

- AVOID making a huge investment without trying something first. For example, buy just one stability ball and see how well it works with your kids. Once you've given it a try, you'll be better able to gauge how many, if any of a particular seat you want to provide.
- AVOID getting hung up on the cutesy and the colors. Your students don't care if all of your balls, stools, pillows, etc. match your theme. They also don't care that you spend three weekends and made two trips to Joann's to sew the perfect pillowcases. The seating is what matters!
- AVOID too much soft seating. It is a good way to spread lice and germs. If you do have soft seating (which I do!) make sure that you can easily clean it!
- AVOID breaking your budget- before you start your journey with flexible seating, create a starting budget & stick to it. As you continue your flexible seating you can always make another investment but you don't want to go for broke up front!

As teachers we so often get stuck investing our own money into our classrooms. This could be a whole blog series in and of itself but here are a few ideas on how to gather up flexible seating choices without breaking the bank!
- Garage sales, craigslist, BST groups & friends: These are great places to find bigger pieces that you won't be able to afford new for your classroom. Mention that it's for your classroom and you may even get a better deal!
- Bargain stores: I have found excellent seating options at stores like Family Dollar and Five Below. These are great because if the seating doesn't work out, breaks, etc. you won't be upset over lost money. (see my posts on Target & Five Below for flex seating ideas!)
- Donors Choose: Sites like Donors Choose are great ways to get flexible seating and other projects funded for your classroom. The only downside is there are usually specific places that you can buy from. You may get more bang for your buck (though Donors Choose isn't really your buck) elsewhere.
- Student's Families: As you begin flexible seating it may be worth it to ask your students what seats they would be interested in. This kind of buy-in and a letter home explaining the purpose might compel some parents to help out with providing the best seating for your class!
No matter what you come up with it will be great! It will allow students choice and options in the classroom and it will grow you and change you as a teacher. The most important thing is that flexible seating is a journey, not a destination. It's not going to happen over night and like everything else in teaching, there will always be room for improvement. So if you're just starting out, pick a few things that you're comfortable with and go from there!


I do lots of these in my kinder classroom: large pillows, small pillows, 3 different rugs around the room, crate seating, clipboards (literally one per student in a big bucket that's easily accessible to all at any time), wiggle seats, long tables come as part of a kinder classroom, so we can share and learn social skills, but I also brought in some regular desks as well for those kiddos who find it hard to concentrate when seated next to chatters.
ReplyDeleteIf you invest in some soft seating, no matter how many you have, you should also invest in some lice-free spray (found easily at Target-non-toxic) and/or use pillows/seats with removable cases.
This article provides great things to think about before beginning the leap into alternative seating!!
That's very true about needing to keep some of the original furniture! Every day I have students opt to sit at a table with a chair. Some of them sit in the same seat each day.
ReplyDeleteand YES to the Lice spray. This is a must! Thanks for the feedback :)